Table of Contents
- What Base To Choose For Melt-And-Pour Soap Base?
- What are the ingredients in melt and pour soap base?
- Step-By-Step Guide to melt-and-pour base
- How do I layer different colors?
- How Long Does It Take Melt-And-Pour Soap To Mold?
- What Is the Difference Between A Melt-And-Pour Soap Base and Regular Soap?
- Can you add oils to melt and pour soap?
- What Are The Things To Avoid In A Melt-And-Soap?
- How do you wrap your soap?
- Conclusion
What’s melt-and-pour, you ask? Well, Melt and Pour is a type of soap. All soap has lye and oils in it, and Melt and Pour is no exception.
It’s such a fun, easy, cost-effective, and quick way to make soap at home, and best of all, it’s kid-friendly.
I’ve been making melt-and-pour soap with my children since they were two years old, with some adult supervision.
Now, melt-and-pour soap is often considered a really easy entry point for soaping in general.
Now, there are tons of more advanced recipes and techniques like swirling, layering, and additives.
Let’s get start
What Base To Choose For Melt-And-Pour Soap Base?
So, the very first place to start when making Melt-and-Pour soap is to
Choose your base, and a really easy place to start if you’re a beginner is either choosing clear melt-and-pour soap or white melt-and-pour soap.
Of course, there are lots of different kinds of bases that you can choose from.
They have additives such as shea butter, Honey, aloe vera, or oats. Now, all melt-and-pour bases are not created equal.
A white melt-and-pour base gives you more pastel colors.
In a white base, you are adding white and the colors together, which gives you a pastel look.
So, when using a white melt-and-pour soap base, consider the colors you want before making your soap.
A clear Melt-and-pour soap base gives you more saturated colors.
Thus, when you add color to a clear base, it’s not competing with anything; you just have the clear plus the color.
So, color-wise, if you want an exact color, just stick with the clear melt-and-pour soap base.
What are the ingredients in melt and pour soap base?
- It requires minimal equipment. All you need is the following:
- A heat-safe container
- Steering utensils
- Isopropyl alcohol (this is optional), it hello, pop bubbles after you are done pouring.
- Thermometer
- A temperature gun, just in case you are checking for layering.
- A mold( preferably silicone mold; they come out easily, or you can use any flexible containers you have at home, like Tupperware, yogurt containers, etc.)
Never use glass or metal wear because you can’t get your soap out.
- Cutting utensils like a crinkle cutter or any utensils available at your disposal that can cut clean through the soaps.
Step-By-Step Guide to melt-and-pour base
Step 1
Chop down your block of soap base into smaller pieces; this helps the soap melt down easily and evenly.
You can use a microwave or a double boiler method if you are melting large amounts of soap.
Pour into a heat-safe container. Ideally, 2-3 minutes is great, making sure that the soap doesn’t get too hot because the soap can get scorched and burn.
When that happens, it turns an extra yellowy color, gets brittle and smells bad.
No one wants that. However, when melting your soap base in the microwave, check on it after every 20-30-second interval and give it a quick stir.
Before the entire 2 or 3 minutes it takes for your soap to melt down completely.
It is an amazing way you can prevent it from burning, boiling, and steaming. None of that is good.
After 2-3 minutes, depending on the quantity of your base, you can use the temperature gun to check the temperature of your soap base.
If you are within the range of 150 or 155 degrees and there are still chunks in your soap base, keep stirring and let the temperature of the
Warm soap melts the final bits rather than trying to overmelt or overheat the soap.
Step 2: Make It Your Own
(Choosing Your Color)
At 140 degrees is the perfect time to add your colorants.
Add your fragrance (you can use any skin-safe fragrance oil, which means no candle or potpourri fragrances).
Once you have chosen the scent, you just need to know how much to use, and it is easy with a fragrance calculator.
You just need to enter how much soap you’re making and then the fragrance oil.
The calculator will give you a range of fragrances to use depending on whether you like light, medium, or strong scents.
If you are still deciding, the medium choice is a great place to start. Add your fragrance oil directly to your soap and stir thoroughly to avoid oil streaks.
Note– If not well stirred, fragrance oil can float to the surface of the soap. So stir well more than you think, especially in white melt-and-pour soap.
Step 3 Add colors.
Let’s talk about colorants. There are two popular colorants, powder or dry colorants, such as pigments, micas, and color blocks.
Powder colorants can be added directly to your soap, but they tend to be clumpy.
That’s especially true for oxides and pigments, which are heavier.
I don’t recommend dry pigments for Melt and pour soaps when you add them without any pre-mixing.
Micas do mix a little bit better than oxides dry, but dispersing those also makes it easier.
To disperse your dry colorants, all you need to do is mix the patterns into a liquid in a separate small bowl.
Isopropyl alcohol is a great choice to mix colorants within melt-and-pour soap because it doesn’t affect the lather.
But if you don’t have that in hand, you can mix the powder with a small amount of lightweight liquid oil.
Be careful with this method, though, because too much extra oil can affect or weigh down the soap lather.
I recommend starting with one teaspoon of color to one teaspoon of alcohol or oil.
Keep adding the dispersed color to the melted soap until you are satisfied with the hue and shade.
Another option, which is my preferred method for adding colorants to melt and pour soap, is to use color blocks.
Color blocks are highly concentrated instead of premixed into melt-and-pour soap.
Divide the melted soap base into separate containers, one for each color layer you plan to create.
Add your chosen soap colorant to each container. Start with a few drops and stir well to achieve the desired color.
You can always add more colorant if needed.
If you’re using a fragrance oil, add it to the individual containers at this stage and mix it in thoroughly.
In addition to these types of colorants, it’s also fun to work with natural colorants such as activated charcoal, clay, turmeric, and more.
Botanicals and exfoliants also work in melt-and-pour soap.
How do I layer different colors?
Creating a rainbow or any layered soap is very easy when you know how!
Calculate the weight of soap required for your finished log/bar and divide it into a separate container for each color. Use scales for accuracy.
Melt the first portion, color it, and pour it into the mold. Spritz with alcohol.
While this is setting, melt the second color portion, and when the first layer is still a little warm but solid enough to support a layer of soap, spritz well with more alcohol.
Next, carefully pour the next layer, making sure it is not too hot, as it will melt the bottom layer if it is.
Spritz immediately with alcohol to remove any bubbles
Continue with this method until you have completed pouring all the layers.
TIP: Use non-bleeding colors (Liquid Pigments, Micas, and Dispersions) unless you want the colored layers to all meld and bleed into one big tie-dyed mass
So when you see a couple of bubbles foaming at the surface
I’m just going to take a little bit of isopropyl alcohol and spritz, and those bubbles will go away.
Having a little bit of bubble on the back of your soap is not a big deal; it’s totally aesthetic.
What doesn’t work is water. Water doesn’t work with the bubbles.
You can go up to 91% alcohol and still have the bubbles pop because what the alcohol does is break up the surface tension of the bubbles that
Allows the bubbles to pop and then gives you a smooth finish on the back of your soap.
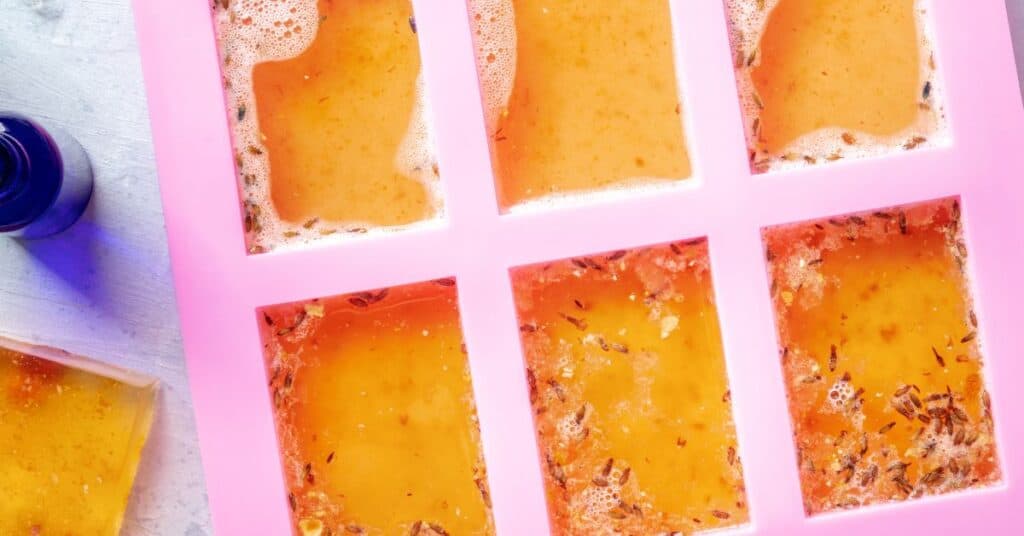
Adding Herbs and Flowers
After you’ve melted the soap base and added color and fragrance (if desired), it’s time to add the herbs and flowers.
Sprinkle a small amount of dried herbs and flowers into the bottom of your soap molds.
Be sure not to overcrowd them, as this can affect the soap’s texture and appearance.
Gently pour a small amount of soap over the herbs and flowers in each mold. This will help anchor the botanicals in place.
Once the soap has partially set, sprinkle more herbs and flowers on top. You can also use a skewer or spoon to arrange them in a visually pleasing way.
Continue to layer herbs and flowers with small pours of melted soap until you’ve achieved the desired look.
You will always get slimy or moldy soap if you add fresh rose petals or frangipani flowers to your MP soap.
That’s unfortunately the way it is. It is a moist environment, and they are going to turn into compost!
If you wish to experiment, ensure the botanical material is WELL DRIED, and the pieces are very small or fine.
Calendula petals are fine, look so nice in white soap, and won’t cause you any problems with mold.
If you add dried lavender flowers, you’ll eventually get mouse poo!
So for Melt & Pour Soap, either add some dried botanicals on top of the bars so that most of the material is out of the soap or use a coffee grinder to powder.
Your herbs and flowers, and this will add a slight exfoliation, but you’ll certainly have them in there.
How Long Does It Take Melt-And-Pour Soap To Mold?
Once your soap has hardened in the mold, it is time to remove it.
Firstly, ensure your soap is COLD.
How long it takes to harden in the mold depends on the size of your mold.
For small sizes, it takes up to 3 hours to harden, but for loaf molds, it can take up to 6 hours.
You always want to make sure that your soap is fully hard before you try to remove it.
Otherwise, it can leak or be too soft and ruin the design, which is never fun.
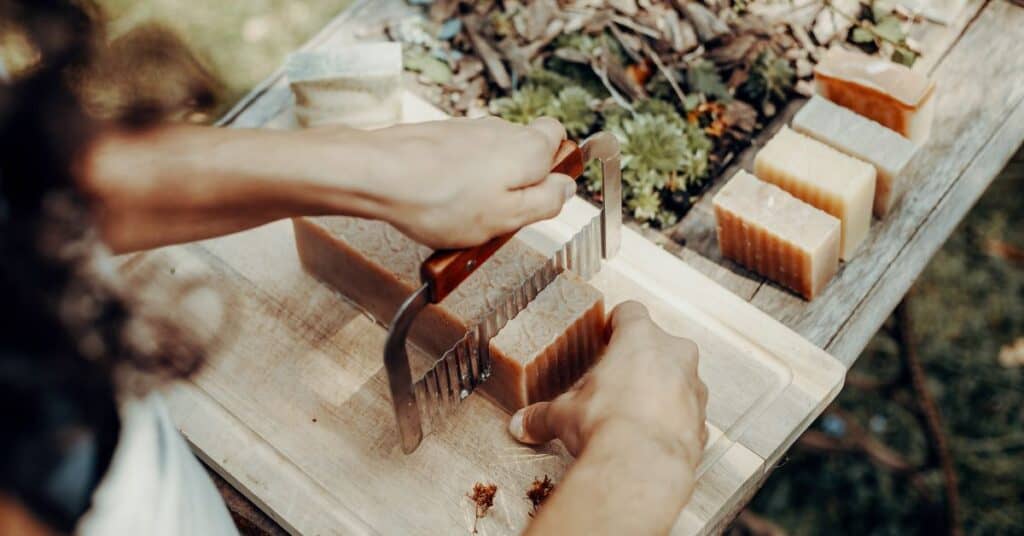
Chopping your soap is easy, but you want to make sure that you are using a sharp knife or a crinkle cutter to add more beauty to it.
What Is the Difference Between A Melt-And-Pour Soap Base and Regular Soap?
So what is the difference?
Well, Melt & Pour soap is exactly what it says on the box.
You do not need to formulate your recipe, mess around with caustic soda, or worry about many of the issues that can (and do) arise with traditional soap making.
You quite literally melt your pre-made soap base and customize it to your preferences with colors, fragrances, and designs.
The soap base itself does differ from a traditional cold process soap; it has to, or you would not be able to melt it down.
But contrary to what you may think, it is still soap; it is still made with lye (also known as sodium hydroxide or caustic soda), but someone else has done that bit for you.
Additionally, the soap base tends to be extremely high in glycerin (vegetable-based), up to 50%, which is what gives this type of soap its characteristic texture.
Incidentally, glycerin is a humectant, which means it attracts moisture, which is a good thing when using it on your skin.
However, it does mean M & P soap tends to sweat as it can attract moisture from the environment, particularly in humid conditions.
Regular Soap: Also known as cold process or hot process soap, regular soap is made from scratch using a combination of oils, fats, and lye.
During the soap-making process, a chemical reaction called saponification occurs, where the lye reacts with the oils to create soap and glycerin.
Additional ingredients, such as essential oils and botanicals, can be added for fragrance and texture.
Can you add oils to melt and pour soap?
Melt-and-Pour Soap usually requires less fragrance and essential oil than Cold Processed Soap does, so it’s a little more economical.
There is no exact amount that covers all aromatics because some essential oils and fragrances are very strong, and others are lighter and more subtle.
However, as a general guide, the following is useful for safety:
For MP Soaping: You can use up to 2.5% Fragrance/Essential Oil for the weight of the soap.
This is the maximum for safety, but mostly, I use 1 – 1.5% in Melt & Pour Soap.
Note: Very strong Essential Oils such as Lemon Myrtle, Lemon Eucalyptus, peppermint, etc., should be used at much lower concentrations (Maximum of 1.5%)
To scent 500g of Soap Base at 2.5%, use 12mls/g of Fragrance/Essential Oil maximum
To scent 500g of Soap Base at 1%, use 5mls/g of Fragrance/Essential Oil
If you are measuring in drops, there are approximately 20 drops per ml.
As an example, for a 100g bar of soap at 1.0%, you would use 20 drops or 1ml.
Remember, you don’t have to scent as high as 2.5% (we don’t need that much in MP), so to judge for your preference and nose, make a 100g bar and count the drops of scent you add.
Can You Add Salt to Melt-And-Pour Soap?
Yes, you can add salt to melt and pour soap, and it serves several purposes:
I recommend using pink Himalayan salt or fine-grain sea salt.
Epsom salt and dead sea salt can dissolve, which can cause a soft bar of soap.
The addition of salt thickens the melt and pour soap base, so have your mold ready and let the soap cool slightly to keep the salt suspended.
You can also place the salt in the bottom of a mold, pour the soap on top, and stir in the mold.
This works better in a mold that makes one bar at a time, not a loaf mold.
I used finely ground pink salt in the soap and coarser ground salt on the top.
You can use fine salt on the top if you wish.
Dead sea salt does not work with Melt and Pour. Use the spa salts.
Dead Sea Salt has a lot of moisture, which could make your MP soap weep.
What Are The Things To Avoid In A Melt-And-Soap?
Things that can happen when our soap has been released from the mold
You might come back the next day and find little, tiny drops—we call them glycerin dews—on your soap.
What is going on, and how do you solve it? So it’s literally called glycerin dew.
Melt-and-pour soap has added glycerin, which is the humectant that draws moisture to the skin.
It also helps the soap remelt down easily; it can also draw moisture from the air and sit on top of the soap.
If you are in a humid climate, you might see all of this dew on top of your soap.
So what do I do? It’s really easy to solve; all you need to do is run a fan over the soap right after you pull the soap out of the mold and let that happen for over 12 hours.
That wicks all that moisture away and keeps your soap fresh.
Another option is simply to use low sweat-like cold process melt-and-pour soap.
What that means is that it has less liquid glycerin added during the soap-base-making process.
So, it’s less prone to forming glycerin dew, and it is a little harder right out of the soap mold.
One of the most beautiful things about melt-and-pour is that it takes a lot of work to mess it up. But one of the sure ways to mess it up is by overheating.
It can change the color, the texture, and any potential design that’s possible.
And it gets gloopy and then hardens all weirdly when you are making the soap.
When soap overheats, it is really hard to get detailed technical soap swirls, like a cute
Technical soap mold because it turns kind of snotty-like, really thick and gloopy, and that’s not great.
So make sure you are maintaining your temperature to 160 or below when making your melt and pour soap.
Ensure you melt and pour the soap at the correct temperature, typically between 120°F to 160°F (49°C to 71°C).
How do you wrap your soap?
You can use old saran wrap; you take your soap bar, facedown your soap bar, and you pull here.
The whole key is that you want it to be pretty tight
It melts and pours soap; there’s no curing time or drying time.
Once your soap is wrapped, it will not get glycerin dew; it stays fresh and clean.
Of course, the reason it is not getting glycerin dew is because the wrap serves as a barrier.
Preventing moisture from entering the bar of soap, extending its shelf life, and also helping to prevent humidity from forming on the bar of soap.
Conclusion
Melt-and-pour soap is a great start for beginners and all soap makers.
It’s such a fun, easy, cost-effective, and quick way to make soap at home, and best of all, it’s kid-friendly.
Following the necessary precautions, your Melt and pour soap is ready to use as soon as it hardens, and it makes a great gift for your friends and family.