Table of Contents
- What is Soap?
- What Are The 4 Types Of Soap Making?
- What Do You Need For Soap Making As a Beginner?
- How To Store Soap For Beginners?
- Final Thoughts
What is the concept of soap making? Soap is technically a sodium salt of a fatty acid. It means that it is a salty type compound.
Soap is formulated due to a chemical reaction called saponification, which occurs when oils or fats combine with a robust alkali solution.
In the case of bar soap, the alkali solution that we use is sodium hydroxide. Or otherwise known as caustic soda.
As an experienced soap maker, I understand the feeling of fear people go through when they want to make soap for the first time.
Many people are interested in making their soap but are slightly scared by the process and unsure what it’s all about and what makes soap lather.
This guide will walk you through the basics of soap-making and the ingredients and equipment you need to get you started.
Let’s start!
What is Soap?
What is soap and its types? Soap comprises two main ingredients: sodium hydroxide or caustic soda and oil, which is diluted in water and combined with base oils or fats.
Depending on which oils and fats are used, you need different amounts of sodium hydroxide.
But the basic process is that these two elements are combined and mixed until they’re emulsified. Once the two are emulsified and blended well, that kicks off that saponification reaction.
What that does is it turns the oils and the sodium hydroxide; they come together, and it turns into soap. The batter eventually hardens, and then it can be cut, and you end up with bars of soap.
What Are The 4 Types Of Soap Making?
Cold Process Soap Making: In this method, oils and lye (sodium hydroxide) are mixed at room temperature.
The mixture is poured into molds, where it undergoes saponification and over 4-6 weeks or more of curing time.
Unlike hot process soap, in C.P.S., heat is generated internally for saponification, and you can gel your soap or not, depending on the recipe. More on the Gel phase
Cold-process soap making allows for greater control over the ingredients and customization of the soap’s properties and requires careful handling of lye and patience.
Hot Process Soap Making: Hot process soap making involves heating the soap mixture to accelerate saponification.
The mixture is cooked in a slow cooker or on the stovetop until it reaches a gel-like consistency. Hot process soap requires the use of an external heat source to bring the soap to the gel phase,
This method yields a finished product more quickly than cold-process soap making.
Design-wise, the hot process has what many call a “rustic” or less refined look, with little to no opportunity for swirling or intricate designs.
Melt and Pour Soap Making: Melt and pour soap making involves melting pre-made soap bases, adding colorants, fragrances, and other additives, and running the mixture into molds.
This method is beginner-friendly and allows for endless creativity in soap design. How to make melt-and-pour soap.
It does not involve working with lye, making it a safer option for those new to soap making.
Rebatching: Rebatching, also known as hand-milled soap making, involves grating pre-made soap bars and melting them with additional ingredients such as essential oils, herbs, or additives.
It is called rebatching for a reason because it is often a method used to recreate a failed soap batch.
The mixture is then remolded and allowed to harden. This method is a great way to salvage failed batches of soap or create custom blends with unique properties.
What Do You Need For Soap Making As a Beginner?
Some of the main ingredients are:
- Sodium hydroxide (Don’t buy drain cleaner; buy caustic soda that says 98% sodium hydroxide, so it needs to be as pure as possible)
- Oils (coconut, olive, castor oil)
- Water
- A bucket or big jar of some sort is needed actually to mix your soap batter.
For beginner recipes, I recommend starting with one kilogram of oil. For 1000-gram oil batches, a two to three-liter size jug is needed.
- You also need another jug or a smaller container for your sodium hydroxide solution. The sodium hydroxide must be mixed with water before it gets combined with the oil.
Note that it must be polypropylene that is heat resistant.
- A stick Blender or a whisk or a spoon; however, A stick blender speeds up the process, and it makes it an excellent, safe way to make the soap as well.
Before soap is saponified, the batter is acidic, so handle it with care.
- A silicone mold, an ice cream bucket, or a log mold. It doesn’t have to be fancy, although this does need to be lined.
Anything that’s not a silicone mold must be lined with nonstick baking paper, parchment paper, or freezer paper so you can pull the soap out and peel the paper off.
- A scale to measure everything accurately.
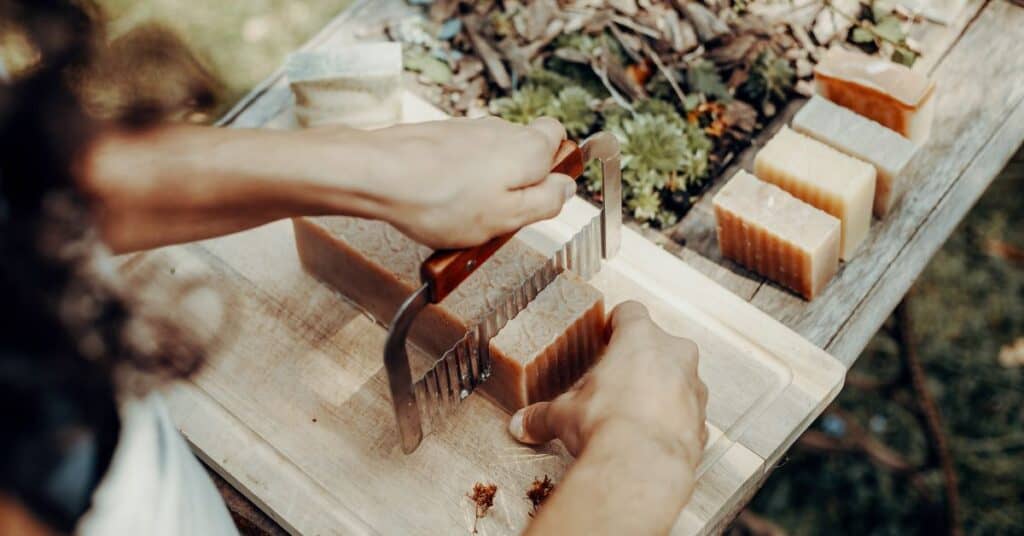
- A soap cutter or knife to cut the soap after it’s cured.
- Silicone spatulas are great for getting all the batter out of your jar, and chopsticks are great for swirlings.
- Safety glasses: If you wear glasses for vision, I recommend getting the big goggles to go over your glasses so you don’t want to get any batter in your eyes.
- Gloves also wear long sleeves.
- There are many other optional ingredients: You can use all sorts of botanical ingredients, like calendula.
You can sprinkle petals on the top of your soap, bentonite clay, activated charcoal, olive leaf, powder, or lovely colorants to set the color and get pretty swirling patterns.
- Newspaper or thick plastic tablecloth or sheeting to cover your area, depending on what your surfaces are made of.
I think it’s better to cover them because I don’t know how the caustic soda solution will interact with the surface, so it’s probably best to protect it.
- Masks: I also use masks when mixing sodium hydroxide solution.
Mixing the sodium hydroxide granules into the water gives off a gas. It reacts and creates heat, giving off a gas that isn’t so great to breathe in.
How To Store Soap For Beginners?
What are the best ways to do it? What’s the best way to do it timing-wise, and how to handle it for your particular situation?
It depends on your situation, and a lot of it depends on your climate. Depending on where you live and your weather, you get away with storing your soaps differently.
For example, I live in the subtropics, which means experiencing humid and damp summers and cool, dry winters.
We don’t get much rain in winter at all. So it depends on the seasons as well.
But what I like to do when I first make my soap is to leave it in the open air; I find the scent of the fragrance and the essential oils very strong at the beginning stage.
When you first make your soap for the first couple of days, when it is still saponifying, that chemical reaction increases the pungency of the sense of some soaps.
So, I don’t like them in the house; they smell a bit too funky for me, and they’re a little bit too strong depending on how the amount you’ve made as well.
I have an outdoor room where I usually keep my soap. However, not everyone will have an outdoor space like mine to put their soap, but if you do, I recommend putting them somewhere away from your general living area unless you love that strong soap smell.
I keep my soaps in the outdoor space, put them on a rack, and leave them there for the first couple of weeks, giving them a chance to dry out.
The rooms have windows, and they get lots and lots of airflow. So that’s what you want. You don’t want to cover or wrap your soaps up until they’re as dry as they can possibly be.
Leave the soaps open if you live in a warm tropical high-humidity environment. Because even if the weather is damp, it’s still better that they’re in the open air.
Putting them inside a cupboard or a drawer in the first couple of weeks, even with a deep dehumidifier, They’re still prone to spoilage.
So I still think, even in that damp weather, leave them out on a shelf, baking rack, or cake cooling rack in the open air to avoid unplanned situations.
If you are keen on starting a soap business and have a room where you plan to keep the soap, getting a dehumidifier is non-negotiable.
What a dehumidifier does is pull the air in the room. Ensure you close the windows and the room doors for effective functioning.
The moisture in the air condenses and falls out into a container at the bottom, and the dry air gets blown out to dry the soap.
I should also mention that when you put your soaps in the racks, space them out so each soap bar has good airflow around it.
So once your soap has had that first couple of weeks curing and that powerful smell has gone out, it’s starting to smell nice again.
You can leave it where you’ve got it if it’s on a drying rack in a good spot and is just a tiny amount. And if you’re happy with it, leave it where it is as long as you desire.
What I do, though, as I said before, live in the subtropics; it can get humid here in summer, and we wouldn’t run our air conditioner all the time.
It was better for me to find a dry place to store my soap to save energy. So, the trick is I have a cupboard with drawers for soap-keeping.
I would stack my soap on a rack inside each drawer and put a mini-dehumidifier alongside the soap in each drawer.
Mini-dehumidifiers attract moisture. They come in handy because the soaps are in a closed drawer, and also, putting soap in a drawer preserves the scent much longer.
Additionally, the mini-dehumidifier contains crystals that can be freshened or refilled.
Final Thoughts
Soap making is an enjoyable and versatile hobby that offers endless opportunities for creativity and self-expression.
By mastering the basics and experimenting with different techniques and ingredients, beginners can create beautiful, customized soaps that are both functional and luxurious.
Remember to prioritize safety, follow recipes and instructions carefully, and most importantly, have fun exploring the wonderful world of soap making!